![]() This year I’ve decided to write on new platform, Medium. The writing experience seems to be superior to WordPress so I’ve made it a goal to only write on there and see if my writing habits improve.
This year I’ve decided to write on new platform, Medium. The writing experience seems to be superior to WordPress so I’ve made it a goal to only write on there and see if my writing habits improve.
You can find all of my new posts there.
How it started
Late last year I was browsing around on Coderwall and came across a cool idea to take a picture of yourself using your webcam everytime you commit some code to git. For the non-technical person, this means that every time you make some changes to a project you are working on, you get to take a shameless seflie! What better way to connect the programmatic world to visual arts than this?
Six months and 302 commits later, after “filming” non-stop all over the world, and by all over the world I mean at work, on the BART, at home and other random places in the San Francisco Bay Area since August of 2013, I am proud to present you my short film, “Git Shots, Chronicles of Coding”.
Git Shots, Chronicles of Coding from Petar Bojinov
Interested in remembering every one of your commits?
Setting it up was a challenge due to the fragmented information scattered among many different sources, so I ended up writing a blog post on how to set it up yourself.
Enjoy and please help spread the word by sharing.
Intro
This is my second MongoDB post of many planned, so I’ve decided to start the Mini Mongo Series, catchy right?
The first problem I faced when setting up my own MongoDB instance on AWS was figuring out how to do simple authentication. If there are no users configured in myDatabase.system.users, anyone can access the database without authenticating. E.g. to prevent anyone from simply going to ec2-xx-xx-xxx.compute-1.amazonaws.com:27017 and accessing the data.
There are a lot of great tutorials on how to add security and authenticate using drivers but they come as many separate small tutorials. So here it is in one unified place and my experiences setting it up. If you you have any questions or comments feel free to comment below.
1. Add a user to the database
We are going to add a user to our database and allow them to use credentials to authenticate later.
First make sure mongod is running without the auth flag.
Then run mongo in another command line to access the interactive MongoDB shell. Lets add a user to our pets database.
$ mongod
...
$ mongo
> use pets
> db.addUser('petar','myPassword');
Now that we have a user created an account, lets allow them to authenticate. Documentation here
> db.auth('petar', 'myPassword');
You can confirm this user was added by running the following.
> db.system.users.find()
2. Confirm that authentication works
A simple test case to ensure our authentication works is to run mongod --auth and try to connect from the mongo command line with and without the user credentials we previously created.
With credentials we expect to see the list of databases
$ mongod --auth
...
$ mongo -u petar -p myPassword
> show dbs
admin 0.203125GB
pets  0.203125GB
Without credentials we expect to see an error saying we are unauthorized
$ mongod --auth
...
$ mongo
> show dbs
failed:{ "ok" : 0, "errmsg" : "unauthorized" }
You’ll see that since we didn’t provide our user credentials, we get an error.
Connect MongoDB to Node.js
Using the MongoDB driver from 10gen and some boilerplate code, we can connect and authenticate to the database using the user we just setup.
| // use 10gen's mongodb driver | |
| var mongo = require('mongodb'), | |
| Server = mongo.Server, | |
| Db = mongo.Db, | |
| db; | |
| // These variables can be passed in from the commmand line or defined in your environment | |
| var mongoServer = process.env.PETAR_MONGODB_DB_HOST, | |
| mongoPort = process.env.PETAR_MONGODB_DB_PORT, | |
| mongoDb = process.env.PETAR_DB_NAME, | |
| mongoUser = process.env.PETAR_MONGODB_DB_USERNAME, | |
| mongoPass = process.env.PETAR_MONGODB_DB_PASSWORD; | |
| // Print out the environment variables to make sure they exist | |
| console.log(mongoServer, mongoPort, mongoDb, mongoUser, mongoPass); | |
| // Initialize the server connection object | |
| var server = new Server(mongoServer, mongoPort, {}); | |
| db = new Db(mongoDb, server); | |
| // Open the connection | |
| db.open(function(err, client) { | |
| // Authenticate the user | |
| client.authenticate(mongoUser, mongoPass, function(err, success) { | |
| if (err) { | |
| console.log('error connecting to MongoDB: ', err); | |
| } | |
| else { | |
| // Do Something ... | |
| console.log('successfully auth to open MongoDB: ', success); | |
| } | |
| }); | |
| }); |
Run the Node.js app with environment variables
In order not to hard code the env variables in your app, which is generally a bad practice, we can pass in the credentials from the command line and have them available under process.env
$ PETAR_MONGODB_DB_HOST=aws.xxx.com \
PETAR_MONGODB_DB_PORT=27018 \
PETAR_DB_NAME=myDbName \
PETAR_MONGODB_DB_USERNAME=authUser \
PETAR_MONGODB_DB_PASSWORD=authUserPass \
node app.js
Conclusion
We’ve managed to create a user, enable authentication, put that authentication to use, and confirm that it is working. Our Node.js app is now connected to our MongoDB instance using an authenticated user, preventing unauthorized access.
$ successfully auth to open AWS MongoDB: true
In-depth Resources
After launching my first node.js + MongoDB API in production, I was religiously monitoring it like parents watching over their first born child.
As traffic started to roll in, the API server began to quietly cry. The average response in milliseconds increased as more and more concurrent queries were happening in the DB. But this wasn’t happening on my local development environment when I was running three times more traffic in my stress tests. Of course localhost beats the production environment any day of the week right?
Long story short, I forgot to enable indexes on the production environment. After adding db.collection.ensureIndex({"items": 1}) to the most important key that I was querying, the beams of sun broke through the cloudy sky.
Lets look at the difference in our famous before and after example:
Before
> GET /sites/?… 200 2691ms – 128b
After
> GET /sites/?… 200 91ms – 128b
And a chart for giggles

Thanks to the awesome folks that make these amazing tools
Update: 2/11/13
On a side note, this small instance was able to handle over 1.5k requests per minute without ever breaking a sweat. Big ups OpenShift.
Intro
I am always trying to connect programming to film & media in any way I can, so what better way than to take a picture of myself with my laptop’s webcam every time I commit some code.
Using a couple commands in terminal and a basic script, you can automate the process, so all you have to do is sit back, commit some code and be photogenic.
In this tutorial, I have compiled the best of other tutorials, gotchas, and related content I have come across on the web. At the end of this, you can even star you in your own git commit movie.
Getting Started
Just a heads up, this is geared towards OSX users… for everyone else, I will add more details when I come across Linux, Windows info 🙂
Step 1: Install imagesnap
brew install imagesnap
Step 2: Create post-commit hook
Add the following code from the gist below to a file called post-commit in your repo’s ~/.git/hooks/ folder.
| #!/bin/bash | |
| function make_image_dir () { | |
| TARGET_DIR=$1 | |
| if [ ! -d "${TARGET_DIR}" ]; then | |
| mkdir "${TARGET_DIR}" | |
| fi | |
| } | |
| function ignore_image_dir () { | |
| TARGET_DIR=$1 | |
| GIT_IGNORE=$2 | |
| grep -q "${TARGET_DIR}" "${GIT_IGNORE}" | |
| if [ $? -gt 0 ]; then | |
| echo "${TARGET_DIR}" >> "${GIT_IGNORE}" | |
| fi | |
| } | |
| function take_photo () { | |
| TARGET_DIR=$1 | |
| DATE_STRING=`date '+%Y_%m_%d-%H_%M_%S'` | |
| imagesnap -q "${TARGET_DIR}/${USER}-${DATE_STRING}.jpg" | |
| } | |
| BASE_DIR=$GIT_DIR/.. | |
| IMAGE_DIR=commit_images | |
| make_image_dir "$BASE_DIR/$IMAGE_DIR" | |
| ignore_image_dir "$IMAGE_DIR" "$BASE_DIR/.gitignore" | |
| take_photo "$BASE_DIR/$IMAGE_DIR" | |
| echo "got a pic of you coding :)" |
Step 3: Enable permissions
Lets give the file some permission (making it executable by everyone).
sudo chmod +x ~/.git/hooks/post-commit
Step 4: Start committing and smiling
On first run, the script will create a folder called commit_images in your repo’s root. Then every time you commit code, a photo is added to the folder and to .gitignore automatically so you don’t have to.
Current Downfall
The only downfall to this solution is you have to add it to each of your git repos manually. So if you have a lot of repos it might be a pain, but then again thats what writing a script is for, right? So behold…the global solution (for new repos)!
Global Solution
1. Enable git templates. This will copy everything in the .git-templates folder to any new git repositories when you git init
git config --global init.templatedir '~/.git-templates'
2. Create our hooks folder for the post-commit template.
mkdir -p ~/.git-templates/hooks
3. Add the post-commit file in ~/.git-templates/hooks/. We can use the same script from above in step 2.
4. Make our post-commit executable. We are giving it executable permission to all users in this case.
sudo chmod +x ~/.git-templates/hooks/post-commit
5. Start committing and smiling. Every time we git init, we now have the post-commit hook in all of our new repos.
Nice to Have
Here are some things I am looking into:
Stitching It All Together (Movie Time)
More details in the link, but we can essentially use ffmpeg to create a short stop motion video of our commit images.
http://www.itforeveryone.co.uk/image-to-video.html
Final Product (The Movie)
I am planning on adding my own video when I amass some pictures, but in the mean time here is a short video sample.
Special Thanks
Intro
I recently built a recipe app using a third-party API that supports CORS. Things were going along well, it was working well on all of the latest browsers (Chrome 28, Firefox 23, IE10). But when I started testing on Internet Explorer 8/9, I wasn’t getting any sort of response from the back-end. I immediately panicked, added a console.log fix and started placing breakpoints on my ajax statements to see what sort of request I was getting back.
The Problem
I came across a “No Transport” error being thrown by jQuery’s ajax. I had never heard of it, so after some searching on msdn and stackoverflow I came across a few suggestions to “quickly” fix this. Such as for jQuery 1.5+:
jQuery.support.cors = true;After a couple other attempts, I accepted the fact that I will have to use IE’s XDomainRequest. To my astoundment, jQuery doesn’t natively support XDomainRequest.
Extending jQuery ajax to support XDomainRequest
Before I started implementing it, I came across a couple library’s on github and gists, but my journey to find the solution eventually lead me to @MoonScript’s jQuery-ajaxTransport-XDomainRequest repo on github. The examples provided worked like a charm on IE8, 9 and it looked like a reputable project, so I added a couple more tests to my outgoing ajax requests, then dropped in MoonScript’s library to my project. Problem solved. No need to reinvent the wheel here.
I couldn’t help myself so I’ll leave you with this:

Conclusion
Good news everybody, IE10 supports CORS using XMLHttpRequest. No more extending jQuery to support XDomainRequest.
XDomainRequest Gotchas
Some other things I came across that will save you a headache.
Resources:

Packt Publishing has recently released “Instant Node.js Starter“, written by prolific open source programmer and active NPM contributor Pedro Teixeira. If you are a beginner JavaScript programmer that is interested in getting your feet wet with server side code, this book is for you.
It is split up into two parts: A quick start tutorial that will help you learn the basics and the top five features you need to know about in Node.js (modules, callback functions, the event emitter, streams, and NPM).
Quick Start
No time wasted here. In the first five minutes of reading, you will have a “Hello World” HTTP server up and running. Teixeira also does a great job explaining what each line of code does and how it contributes to the whole program.
Top Five Features
Teixeira nails it with the top five features. He demonstrates the most widely used features with simple and easy to understand examples.
Conclusion
Overall this book is a great introduction to Node.js and a stepping stone to getting you started on your first Node.js project.
The book finishes up with useful a compilation of community resources to help you explore related topics and continue learning.

Intro
This week I attended the 6th annual Google developer conference in San Francisco, which featured technical sessions revolved around cutting edge web and mobile technologies. With the three day ceremony now over, lets take a look at some of the exciting things announced and some of my favorite parts of the event.
Android
Number of Android Devices – It has been a big year for Android, seeing over 900 million activations since October of 2008. This high number doesn’t necessarily reflect the active user count but a later announced number of over 100 million users on the Android Gmail and stock mail app, certainly sheds some light on a total active user count.
Android Studio – My favorite Android bit was the announcement for Android Studio, based on the community version of Intellij IDEA. I have long been using Intellij for its incredible search features and autocomplete. Along with that, Android Studio brings a rich layout editor allowing you to view your design on multiple devices on the fly. It also comes with a template wizard to help you scaffold commonly used components and reduce the need to write boilerplate. And more more…
Chrome
Active Users – My best friend Chrome was announced to have over 750 million monthly active users (was previously measured in weekly active users, but was moved to reflect industry standard measurement). These are some impressive numbers that I like to see in the battle over global control with Internet Explorer.
Developer Tools – A great step forward to effective editing using DevTools, Paul Irish showed off how to map the DevTools to a local folder so that changes made in the browser persist to disk. For those on OSX that develop for Android, check out the ADBPlugin, a Chrome extension that runs an ADB daemon and enables remote debugging for mobile.
Compression – Two impressive compression standards that caught my eye:
Come on other browsers, lets support the web’s latest and greatest!
IGNITE talks
I had never heard of this prior to I/O, but I would have to say this was probably one of my favorite talks. There were fifteen participants who spoke for five minutes on personal and professional passions. Each speaker had 20 slides that changed every 15 seconds without their will. These rapid fire are all about learning many new things in quick succession, or as Ignite puts it, “Enlighten us, but make it quick”.
Participants topics included: effective online education in Spanish, comic book story progression, K-pop music history, building a 40-foot statue for Burning Man, preserving digital memories effectively, electronics from Gongkai, the process of idea to startup, visualizing prime numbers, and a couple more on the effects of technology outside of the United States.
I’m really looking forward to another one of these in the Bay Area sometime soon.
Conclusion
Keep An Eye On – In no particular order: Web Components, WebRTC, Angular JS, Google Compute Engine.
Person to Person – My favorite thing about I/O, was being able to talk to the huge range of Google developers in person. It made me realize how important it is to be on a personal level with other people, to build a relationship. How so much can be learned, accomplished, and answered when you are speaking face to face. Forget that long thread on Twitter, Google+, or email. The level of talk accomplished online can never be the same. When you have the opportunity to be personable, don’t forget to use it. Talk face to face, in person. Trust me, you won’t regret it.
Resources:
Moving on to Mountain Lion from Snow Leopard was probably the best thing I could have done for my early 2009 White Macbook. I have been using it to program for over 4 years now and I could not have been happier with it. It might only have 4 GB of RAM and a 2.13 ghz Core 2 Duo but it still runs like a beast. The only downside was I was running out of hard drive space and in result the crippling OS performance. If you want to see some tips to making your Mountain Lion install feel like the previous versions, skip ahead to the bottom.
Getting a new hard drive
First thing I did was buy a new 1TB Samsung Spinpoint M8. Replacing the old 120GB hard drive has been long overdue. It was between the Samsung, a 7200RPM 750GB Seagate Momentus, or a WD 7200RPM 750GB Scropio Black. After looking at some reviews on stroragereview, I was convinced the extra 250GB and longer battery life was worth the Samsung M8. Skip ahead a couple days and I got the Samsung installed in my Macbook.
Upgrading to Mountain Lion
The only thing stopping me from upgrading in the past, was the amount of space left on my hard drive. So with almost unlimited space left, the next logical step was to upgrade to Mountain Lion. Before buying my copy, I put in my laptop serial number here (to see if it is a supported model) and compared it to the minimum requirements for installing Mountain Lion here. Looks like I met the requirements. Now I fired up the app store, found the Mountain Lion update and let it fire.
Three things I didn’t like about Mountain Lion
1. Reversed Scrolling
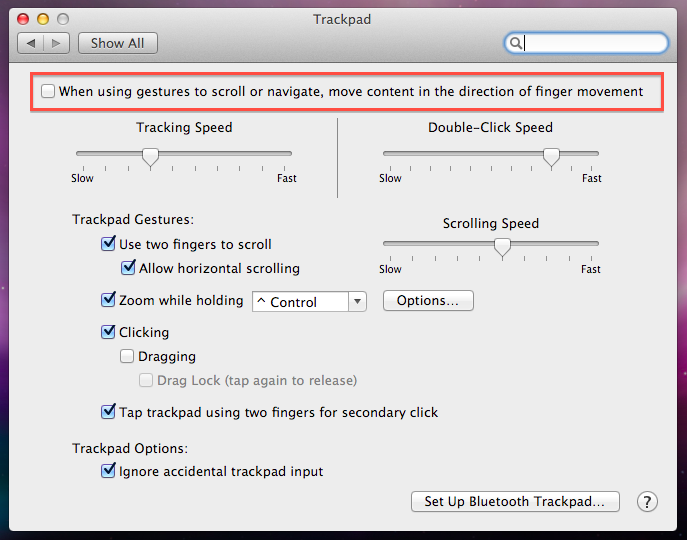
The scrolling is reversed to make it feel like natural iPhone and iPad scrolling. To fix this, go to System Preferences > Trackpad/Mouse, and uncheck the ‘When using gestures to scroll or navigate, move content…’. Reversed scrolling begone!
2. New Finder window opens up ‘All My Files’
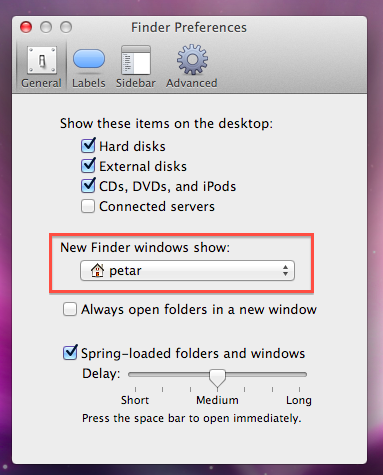
Again something new for me in Mountain Lion. This new ‘All My Files’ takes a long time to load and lags the finder. Just like in the Snow Leopard I like to have it open up to a custom folder. You can do so by going to Finder > Preferences (CMD + ,). Then under ‘New Finder Window show’ change it to your liking.
3. Drive Status in Finder
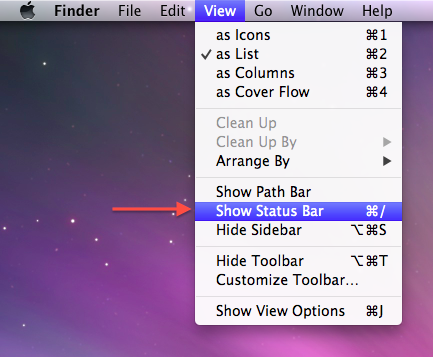
Every drive use to have a status at the bottom of the Finder window. The status included the number of items and size remaining of the drive. It is incredibly when using external USB devices so you can see how many more items you can cram on the device before you run out of space. This can be fixed easily. Once you have Finder open, go to View > Show Status Bar (or press CMD + /)

Getting things done makes the rest of the day even better. It gives leeway for the next day to be just as awesome. While I get plenty of of things done during the course of the day, I’m not talking about just knocking off an item from the todo list. I am talking about considerable progress [on a project]…seeing a feature work, committing it, pushing it to GitHub, then deploying it. Otherwise its sad panda.

