Late last year I was browsing around on Coderwall and came across a cool idea to take a picture of yourself using your webcam everytime you commit some code to git. For the non-technical person, this means that every time you make some changes to a project you are working on, you get to take a shameless seflie! What better way to connect the programmatic world to visual arts than this?
Six months and 302 commits later, after “filming” non-stop all over the world, and by all over the world I mean at work, on the BART, at home and other random places in the San Francisco Bay Area since August of 2013, I am proud to present you my short film, “Git Shots, Chronicles of Coding”.
Interested in remembering every one of your commits?
Setting it up was a challenge due to the fragmented information scattered among many different sources, so I ended up writing a blog post on how to set it up yourself.
This is my second MongoDB post of many planned, so I’ve decided to start the Mini Mongo Series, catchy right?
The first problem I faced when setting up my own MongoDB instance on AWS was figuring out how to do simple authentication. If there are no users configured in myDatabase.system.users, anyone can access the database without authenticating. E.g. to prevent anyone from simply going to ec2-xx-xx-xxx.compute-1.amazonaws.com:27017 and accessing the data.
There are a lot of great tutorials on how to add security and authenticate using drivers but they come as many separate small tutorials. So here it is in one unified place and my experiences setting it up. If you you have any questions or comments feel free to comment below.
1. Add a user to the database
We are going to add a user to our database and allow them to use credentials to authenticate later.
First make sure mongod is running without the auth flag.
Then run mongo in another command line to access the interactive MongoDB shell. Lets add a user to our pets database.
$ mongod
...
$ mongo
> use pets
> db.addUser('petar','myPassword');
Now that we have a user created an account, lets allow them to authenticate. Documentation here
> db.auth('petar', 'myPassword');
You can confirm this user was added by running the following.
> db.system.users.find()
2. Confirm that authentication works
A simple test case to ensure our authentication works is to run mongod --auth and try to connect from the mongo command line with and without the user credentials we previously created.
With credentials we expect to see the list of databases
$ mongod --auth
...
$ mongo -u petar -p myPassword
> show dbs
admin 0.203125GB
pets  0.203125GB
Without credentials we expect to see an error saying we are unauthorized
You’ll see that since we didn’t provide our user credentials, we get an error.
Connect MongoDB to Node.js
Using the MongoDB driver from 10gen and some boilerplate code, we can connect and authenticate to the database using the user we just setup.
This file contains hidden or bidirectional Unicode text that may be interpreted or compiled differently than what appears below. To review, open the file in an editor that reveals hidden Unicode characters.
Learn more about bidirectional Unicode characters
In order not to hard code the env variables in your app, which is generally a bad practice, we can pass in the credentials from the command line and have them available under process.env
We’ve managed to create a user, enable authentication, put that authentication to use, and confirm that it is working. Our Node.js app is now connected to our MongoDB instance using an authenticated user, preventing unauthorized access.
After launching my first node.js + MongoDB API in production, I was religiously monitoring it like parents watching over their first born child.
As traffic started to roll in, the API server began to quietly cry. The average response in milliseconds increased as more and more concurrent queries were happening in the DB. But this wasn’t happening on my local development environment when I was running three times more traffic in my stress tests. Of course localhost beats the production environment any day of the week right?
Long story short, I forgot to enable indexes on the production environment. After adding db.collection.ensureIndex({"items": 1}) to the most important key that I was querying, the beams of sun broke through the cloudy sky.
Lets look at the difference in our famous before and after example:
Before
> GET /sites/?… 200 2691ms – 128b
After
> GET /sites/?… 200 91ms – 128b
And a chart for giggles
Thanks to the awesome folks that make these amazing tools
I am always trying to connect programming to film & media in any way I can, so what better way than to take a picture of myself with my laptop’s webcam every time I commit some code.
Using a couple commands in terminal and a basic script, you can automate the process, so all you have to do is sit back, commit some code and be photogenic.
In this tutorial, I have compiled the best of other tutorials, gotchas, and related content I have come across on the web. At the end of this, you can even star you in your own git commit movie.
Getting Started
Just a heads up, this is geared towards OSX users… for everyone else, I will add more details when I come across Linux, Windows info 🙂
Step 1: Install imagesnap
brew install imagesnap
Step 2: Create post-commit hook
Add the following code from the gist below to a file called post-commit in your repo’s ~/.git/hooks/ folder.
This file contains hidden or bidirectional Unicode text that may be interpreted or compiled differently than what appears below. To review, open the file in an editor that reveals hidden Unicode characters. Learn more about bidirectional Unicode characters
Lets give the file some permission (making it executable by everyone).
sudo chmod +x ~/.git/hooks/post-commit
Step 4: Start committing and smiling
On first run, the script will create a folder called commit_images in your repo’s root. Then every time you commit code, a photo is added to the folder and to .gitignore automatically so you don’t have to.
Current Downfall
The only downfall to this solution is you have to add it to each of your git repos manually. So if you have a lot of repos it might be a pain, but then again thats what writing a script is for, right? So behold…the global solution (for new repos)!
Global Solution
1. Enable git templates. This will copy everything in the .git-templates folder to any new git repositories when you git init
Packt Publishing has recently released “Instant Node.js Starter“, written by prolific open source programmer and active NPM contributor Pedro Teixeira. If you are a beginner JavaScript programmer that is interested in getting your feet wet with server side code, this book is for you.
It is split up into two parts: A quick start tutorial that will help you learn the basics and the top five features you need to know about in Node.js (modules, callback functions, the event emitter, streams, and NPM).
Quick Start
No time wasted here. In the first five minutes of reading, you will have a “Hello World” HTTP server up and running. Teixeira also does a great job explaining what each line of code does and how it contributes to the whole program.
Top Five Features
Teixeira nails it with the top five features. He demonstrates the most widely used features with simple and easy to understand examples.
Conclusion
Overall this book is a great introduction to Node.js and a stepping stone to getting you started on your first Node.js project.
The book finishes up with useful a compilation of community resources to help you explore related topics and continue learning.
This week I attended the 6th annual Google developer conference in San Francisco, which featured technical sessions revolved around cutting edge web and mobile technologies. With the three day ceremony now over, lets take a look at some of the exciting things announced and some of my favorite parts of the event.
Android
Number of Android Devices– It has been a big year for Android, seeing over 900 million activations since October of 2008. This high number doesn’t necessarily reflect the active user count but a later announced number of over 100 million users on the Android Gmail and stock mail app, certainly sheds some light on a total active user count.
Android Studio– My favorite Android bit was the announcement for Android Studio, based on the community version of Intellij IDEA. I have long been using Intellij for its incredible search features and autocomplete. Along with that, Android Studio brings a rich layout editor allowing you to view your design on multiple devices on the fly. It also comes with a template wizard to help you scaffold commonly used components and reduce the need to write boilerplate. And more more…
Chrome
Active Users – My best friend Chrome was announced to have over 750 million monthly active users (was previously measured in weekly active users, but was moved to reflect industry standard measurement). These are some impressive numbers that I like to see in the battle over global control with Internet Explorer.
Developer Tools – A great step forward to effective editing using DevTools, Paul Irish showed off how to map the DevTools to a local folder so that changes made in the browser persist to disk. For those on OSX that develop for Android, check out the ADBPlugin, a Chrome extension that runs an ADB daemon and enables remote debugging for mobile.
Compression – Two impressive compression standards that caught my eye:
WebP (Images) – Examples showed 30% file size reduction over similar SSIM images (png, jpg) while keeping same quality. The downfall is it is only supported on Chrome 28+, Opera 11.10 and Android Ice Cream Sandwhich. You can use a tool such as PageSpeed to serve WebP optimized images to clients that support it or through checking accept headers.
VP9 (Video) – Something Google has been working on since 2011, it promises to reduce your bandwidth costs by 50% if you encode your videos with VP9 vs. H.264. A good resource if you want to learn more, Ronald Bultje praises for fast and early adoption in his I/O talk this year. I was looking at some examples at the Chrome booth and a 100mb VP9 video looked exactly the same as a 350mb H.264.
Come on other browsers, lets support the web’s latest and greatest!
IGNITE talks
I had never heard of this prior to I/O, but I would have to say this was probably one of my favorite talks. There were fifteen participants who spoke for five minutes on personal and professional passions. Each speaker had 20 slides that changed every 15 seconds without their will. These rapid fire are all about learning many new things in quick succession, or as Ignite puts it, “Enlighten us, but make it quick”.
Participants topics included: effective online education in Spanish, comic book story progression, K-pop music history, building a 40-foot statue for Burning Man, preserving digital memories effectively, electronics from Gongkai, the process of idea to startup, visualizing prime numbers, and a couple more on the effects of technology outside of the United States.
I’m really looking forward to another one of these in the Bay Area sometime soon.
Conclusion
Keep An Eye On – In no particular order: Web Components, WebRTC, Angular JS, Google Compute Engine.
Person to Person – My favorite thing about I/O, was being able to talk to the huge range of Google developers in person. It made me realize how important it is to be on a personal level with other people, to build a relationship. How so much can be learned, accomplished, and answered when you are speaking face to face. Forget that long thread on Twitter, Google+, or email. The level of talk accomplished online can never be the same. When you have the opportunity to be personable, don’t forget to use it. Talk face to face, in person. Trust me, you won’t regret it.
Moving on to Mountain Lion from Snow Leopard was probably the best thing I could have done for my early 2009 White Macbook. I have been using it to program for over 4 years now and I could not have been happier with it. It might only have 4 GB of RAM and a 2.13 ghz Core 2 Duo but it still runs like a beast. The only downside was I was running out of hard drive space and in result the crippling OS performance. If you want to see some tips to making your Mountain Lion install feel like the previous versions, skip ahead to the bottom.
Getting a new hard drive
First thing I did was buy a new 1TB Samsung Spinpoint M8. Replacing the old 120GB hard drive has been long overdue. It was between the Samsung, a 7200RPM 750GB Seagate Momentus, or a WD 7200RPM 750GB Scropio Black. After looking at some reviews on stroragereview, I was convinced the extra 250GB and longer battery life was worth the Samsung M8. Skip ahead a couple days and I got the Samsung installed in my Macbook.
Upgrading to Mountain Lion
The only thing stopping me from upgrading in the past, was the amount of space left on my hard drive. So with almost unlimited space left, the next logical step was to upgrade to Mountain Lion. Before buying my copy, I put in my laptop serial number here (to see if it is a supported model) and compared it to the minimum requirements for installing Mountain Lion here. Looks like I met the requirements. Now I fired up the app store, found the Mountain Lion update and let it fire.
Three things I didn’t like about Mountain Lion
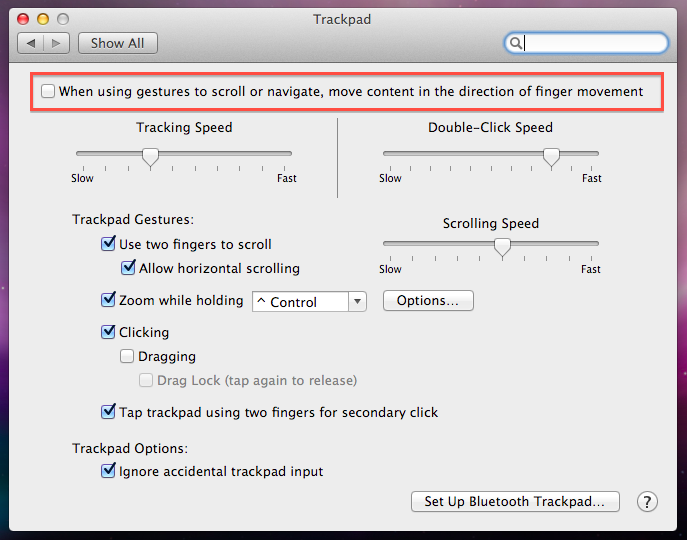
1. Reversed Scrolling
The scrolling is reversed to make it feel like natural iPhone and iPad scrolling. To fix this, go to System Preferences > Trackpad/Mouse, and uncheck the ‘When using gestures to scroll or navigate, move content…’. Reversed scrolling begone!
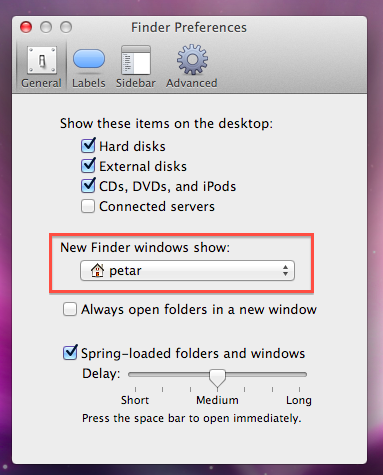
2. New Finder window opens up ‘All My Files’
Again something new for me in Mountain Lion. This new ‘All My Files’ takes a long time to load and lags the finder. Just like in the Snow Leopard I like to have it open up to a custom folder. You can do so by going to Finder > Preferences (CMD + ,). Then under ‘New Finder Window show’ change it to your liking.
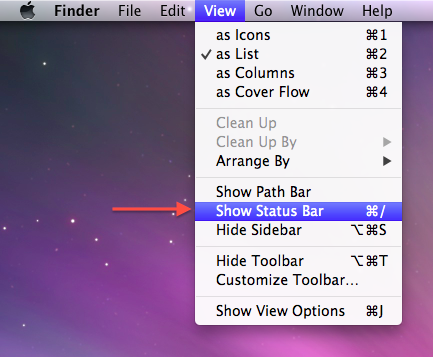
3. Drive Status in Finder
Every drive use to have a status at the bottom of the Finder window. The status included the number of items and size remaining of the drive. It is incredibly when using external USB devices so you can see how many more items you can cram on the device before you run out of space. This can be fixed easily. Once you have Finder open, go to View > Show Status Bar (or press CMD + /)
This is not a battle between flat geometry and spherical geometry to calculate distances between points. This falls somewhere between a rant, my thoughts on the subject, and how we can improve proximity based applications to return relevant results.
Proximity is the state of being accurately close to something. In our case we have an individual trying to find the closest fast-food location while driving (I know you shouldn’t be using your phone when driving, but let’s make an exception). An app uses the individual’s location, its latitude and longitude, to determine the closest burger shack. The nearest five locations are sent back and our individual is on their way to grubbing down.
The biggest problem I have noticed with location based recommendations, is that they fail to take into consideration the distance between two points on a map (arc length) versus the distance between two points while driving (linear). The distance is NOT the same. By simply calculating the two points a map, the distance will tend to be much shorter because there are no streets, directions, or obstacles. While driving there are factors such as speed, traffic, and one-way streets to take into consideration.
Imagine driving on a road with an app’s suggested location on your left hand side over the freeway but the shortest path to this location is to go down the road for 3 miles then another 3 miles back, when the closest location is actually 4 miles down the road.
Flat Geometry
Lets examine this by first calculating the distance between two points while driving. My starting location is in a parking lot at 37.3879242, -121.9821091. To get to the nearest IN-N-Out burger (37.3610039,-122.0248489), I have to drive down a street which takes me out of the way, then get on the freeway, and make a couple more turns. The shortest possible path according to Google Maps is 5.1 miles [1].
Spherical Geometry
Now we compute this using the Haversine Forumla, a commonly used spherical formula in navigation, to find the distance between two points on a sphere. For the sake of brevity, the result is 2.996 miles [2]. The first downfall is the precession of the Earth’s radius; it is rounded to 3961 miles, which is optimized for locations around 39 degrees from the equator (roughly the latitude of Washington DC, USA). A more precise number is difficult to calculate because the Earth is not perfectly spherical, so no single value serves as an exact radius. I think that locations in a radius are most useful when they simply act as a reference, not as a directive.
The Difference
Comparing the two results, the difference between them is huge…at 2.104 miles. And this is only for locations within a radius of 10 miles. The distance between two points in a radius of 50 miles would be increasingly less accurate when driving because the number of required turns would increase. We can think of all these turns as the sum of the two shorter sides of triangles (not hypotenuse). While using spherical geometry is a straight shot because there are no extra deltas (it’s the hypotenuse).
Then again computing the latter is significantly easier and faster than the prior. Tools such as MongoDB’s geospacial queries [3] makes distance calculation easy and flexible but lack one thing, the shortest path. The most optimal solution would be combining spherical geometry with a shortest path algorithm such as Dijkstras [4] to determine to nearest location the with shortest route. While the shortest path is not necessary for all use cases, it matters the most when you are driving to your destination.
Just remember, “Fast is fine, but accuracy is everything.”
If you have encountered your Google Analytics data not being sent to the server, you know how frustrating it can be waiting until the next day and seeing no results in the dashboard. Here are a couple things I encountered in my search for this and some great solutions the problem.
The first is about encoding the GA key. Do not encode the dashes in the ga_trackingId string. Doing so will prevent you from seeing any data in your reports. This can be a big problem because the Android Lint offers this as one of their ‘improvements’ :
Replace “-” with an “en dash” character (–,&&;#8211;)?
Do not let Lint encode the dashes in your GA key! It will break Google Analytics.
The second is a precaution measure that will make sure you are not sending old or corrupt data to the GA server. If you are offline and using your app, events are added to a queue and then stored in a local database, but never fired due to lack of connection. This can cause some problems with events never firing. So to clean the local GA database file, use the following:
File analyticsDB = new File(c.getApplicationInfo().dataDir + “/databases/”, “google_analytics.db”);
if (analyticsDB.exists()) { analyticsDB.delete(); }
And last but not least, the most important piece of advice. No one dared to mention that once you clean your project, it will switch it back to the en_dash encoding. To fix this encoding problem follow these steps (Note this is specifically for Eclipse on a Mac but i’m sure the settings are located in a similar place for PC):
Go into your preferences (on Mac for it’s Eclipse -> Preferences)
Go to Android
Go to Lint error Checking
You can either disable Lint checker completely or disable just the en_dash thing (what I did)
Find the one called “TypographyDashes” under Usability:Typography or search “dash” inside the search box. It should come up with TypographyDashes.
Highlight it and turn it to “Ignore” under the severity
From there click ‘apply’ and then allow it to re-lint.
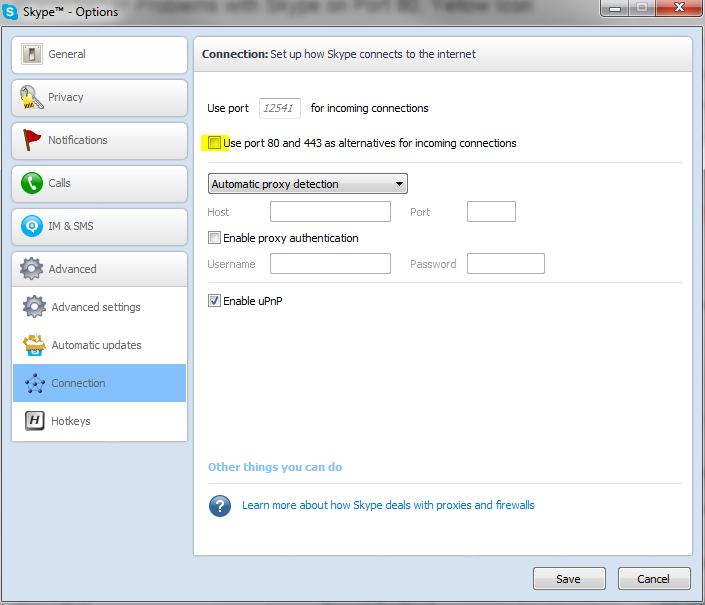
For those who have tried to start WampServer with Skype already running, you might have been faced with the yellow icon in the windows notification area and WAMP not starting. This is because Skype is using Port 80 and 443 as alternatives for incoming connections and apache wants to listen to Port 80 as well, therefore causing WAMP to not start up.
To disable Skype from using Port 80 and 443, go to Tools > Options > Advanced > Connection, then uncheck the ‘Use port 80 and 443 as alternatives for incoming connections’.
Now close Skype, and restart WAMP by left clicking the WAMP icon in the system notifications and selecting ‘Restart All Services’ under ‘Quick Admin’.
My suggestion to anyone who is having this problem is close all other programs that might be listening to Port 80 on your computer and then open up WAMP.